How to Screen Record on iPhone

Capturing your iPhone screen is a quick and effective way to share tutorials, record gameplay, or save memorable moments from apps. With the built-in screen recording feature on iOS, you can effortlessly record your screen along with sound. Whether you’re documenting an issue for tech support or sharing a how-to guide, screen recording makes it simple.
In this guide, we’ll cover how to start, stop, and customize screen recordings on your iPhone. Follow these easy steps to master the screen recording feature.
How to Enable Screen Recording option in iPhone
Before you start recording, ensure the Screen Recording option is available in your Control Center. Here’s how:
- Step 1 - Open the Settings app on your iPhone.
- Step 2 - Scroll down and tap Control Center.
- Step 3 - Under “More Controls,” locate Screen Recording and tap the green + icon.
- Step 4 - The Screen Recording button is now added to your Control Center for quick access.
How to Record Your Screen in iPhone
Once the Screen Recording button is in your Control Center, you’re ready to start recording.
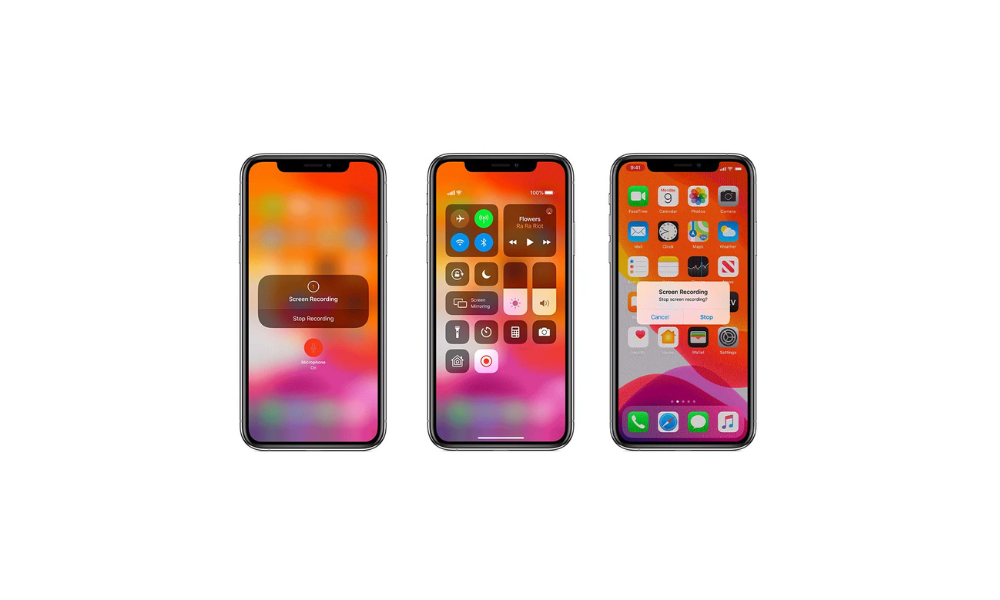
Step 1 - Access Control Center:
- On iPhones with Face ID, swipe down from the top-right corner of the screen.
- On iPhones with a Home button, swipe up from the bottom of the screen.
Step 2 - Start Recording:
- Tap the gray Record button (a circle icon with a dot inside).
- A three-second countdown will appear, signaling that the recording is about to begin.
- Exit Control Center to record your screen.
Step 3- Stop Recording:
- To stop, tap the red Recording bar at the top of your screen, then tap Stop.
- Alternatively, open the Control Center and tap the red Record button.
Step 4 - Access Your Recording:
- Open the Photos app and navigate to your Library. Your screen recording will appear as the latest video.
How to Record with Sound in iPhone
By default, screen recordings capture video but not external sound. To include audio, such as narration, follow these steps:
- Step 1- Open the Control Center and locate the Screen Recording button.
- Step 2 - Touch and hold the button until the Microphone Audio option appears.
- Step 3 - Tap the Microphone to turn it on (it will change to red, indicating it’s active).
- Step 4 - Start your screen recording as usual.
This feature is ideal for creating tutorials or providing voiceover explanations during recordings.
What are the Key Considerations for Screen Recording
- App Restrictions: Some apps may block screen recording due to privacy or copyright reasons. In these cases, you won’t be able to capture video or audio.
- Screen Mirroring: You cannot use screen recording while screen mirroring is active. Disable mirroring to use the recording feature.
- Storage: Ensure your iPhone has enough storage space to save your recordings. Large recordings can consume significant space.
How to Troubleshoot Screen Recording Issues
If you can’t find the Screen Recording button or it isn’t functioning properly:
- Step 1 - Go to Settings > Control Center and ensure Screen Recording is added to your controls.
- Step 2 - Restart your iPhone if the feature still doesn’t appear.
- Step 3 - Update your iPhone to the latest version of iOS, as screen recording may not be supported on older versions.
Use Cases for Screen Recording
- Tutorials: Create step-by-step guides for family, friends, or coworkers.
- Game Streaming: Record gameplay to share your achievements or strategies.
- Bug Reporting: Document software issues visually for tech support.
- Educational Content: Record lessons or presentations for students or colleagues.
- Memory Preservation: Save fleeting moments from apps or websites.
With iPhone’s screen recording feature, capturing and sharing your screen has never been easier. Customize the settings to suit your needs, and let your creativity shine with clear, high-quality recordings. Whether for professional use or personal fun, screen recording is a handy tool to have at your fingertips.
Check out some of the best tricks and tips related to the world of Apple Products in our iSTYLE Blogs.

 United Arab Emirates
 Oman
Oman Lebanon
 Morocco
 Iraq
Iraq Hungary
 Romania
 Czech Republic
 Serbia
 Croatia
 Slovakia
 Bulgaria
 Slovenia
 Macedonia
 Spain (K-Tuin)


